SoundPrepper Manual
Overview
SoundPrepper is a utility for preparing production sound WAV/BWF assets for smooth post workflows: offloading, trimming, inspecting and editing metadata, validating timecode consistency, and performing common file operations (rename, split, combine, export reports) with an emphasis on safety and repeatability.
Key ideas
• A file is a WAV/BWF asset on disk.
• A take (or take group) may consist of multiple related files (for example: a poly file plus ISO siblings, or a merged ISO group).
• Metadata lives both in the filename and inside file headers/chunks (BEXT, iXML, LIST/INFO, and optional vendor chunks). SoundPrepper aims to keep these consistent.
Safety notes
SoundPrepper performs operations that can affect deliverables:
• Metadata edits write into the file header. Use backups and test on copies when building a new workflow.
• Timecode-related edits can change how DAWs and NLEs interpret sync. Be deliberate about "Preserve Start TC" and frame rate changes.
• macOS file permissions are handled via security-scoped bookmarks and coordinated writes. If you move files or change volumes, you may be prompted again.
Offload
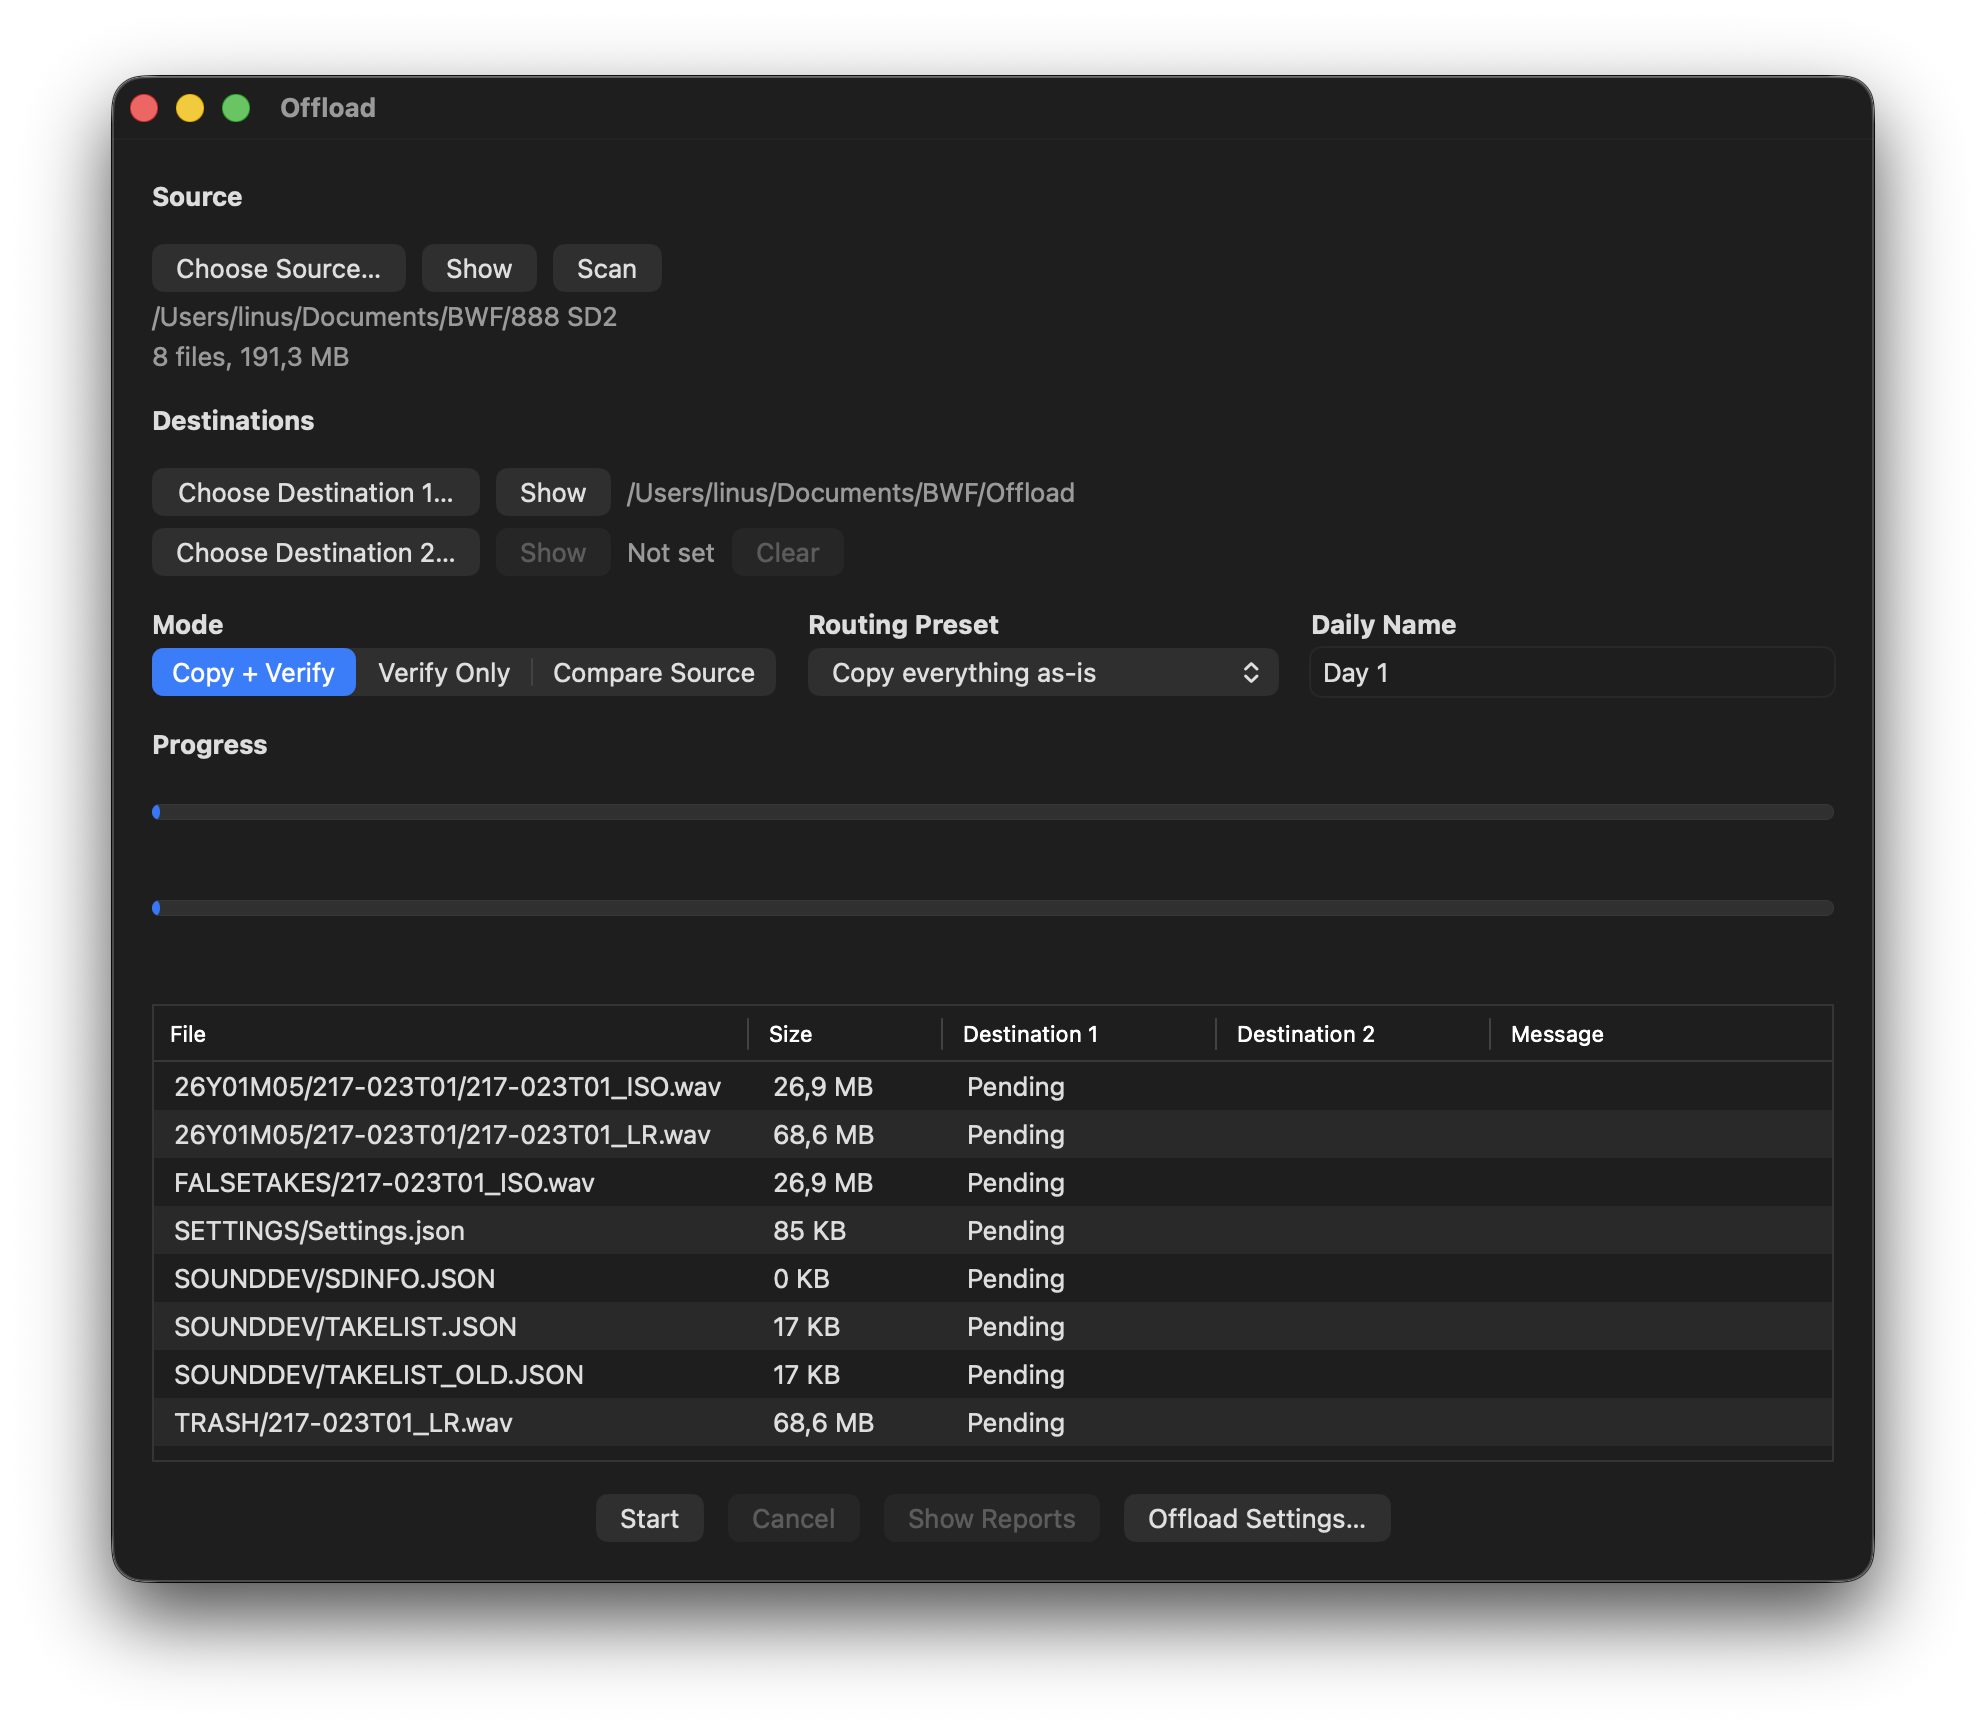
The Offload window is used to copy, verify, or compare production sound between a source folder and one or two destination folders. It is designed for field-audio workflows where verified copies and a clear audit trail matter.
 Basic workflow
1. Choose a source folder.
2. Choose Destination 1.
3. Optionally choose Destination 2 for a second destination.
4. Select an offload mode.
5. Select a routing preset.
6. Confirm or edit the Daily Name.
7. Click Scan to build the file list.
8. Click Start to begin the run.
The file list shows every planned file along with its size, status for each destination, and any warning or error message.
Offload modes
Basic workflow
1. Choose a source folder.
2. Choose Destination 1.
3. Optionally choose Destination 2 for a second destination.
4. Select an offload mode.
5. Select a routing preset.
6. Confirm or edit the Daily Name.
7. Click Scan to build the file list.
8. Click Start to begin the run.
The file list shows every planned file along with its size, status for each destination, and any warning or error message.
Offload modes
 Folder structure validation
For all routing presets except Copy everything as-is, SoundPrepper validates the source structure before starting. This validation is intentionally strict. If the selected source does not match the expected folder layout used by Sound Devices recorders, the run will not start. This helps prevent files from being routed into an incorrect destination structure.
Daily Name
The Daily Name is the destination folder name used for the run. In some workflows this matches the recorder’s original Daily folder name, but it can also be renamed for the destination.
Source and destination selection
The source is the folder you want to offload or compare from. This can be a recorder Daily folder or a supported Sound Devices card root.
Destination 1 is required. Destination 2 is optional. If Destination 2 is set, SoundPrepper can copy, verify, or compare a second destination in the same run.
Verification and reporting
During a run, SoundPrepper tracks progress overall and per file. Each file is given a status such as Pending, Copied, Verified, Skipped, Skipped (Verified), Not Verified, or Error.
At the end of a Copy + Verify or Verify Only run, SoundPrepper writes an offload manifest containing the planned file list and hashes, plus an offload report summarizing the result, warnings, errors, and per-file outcomes.
At the end of a Compare Source run, SoundPrepper writes compare-named report files. These provide an audit trail for the comparison but are kept separate from normal OffloadManifest_* files so they are not used by Verify Only scans.
Reports are stored in the configured reports folder inside the destination. If enabled in Offload Settings, reports can be saved to both destinations and revealed automatically when the run finishes.
Existing file handling
If a file already exists at the destination during Copy + Verify, SoundPrepper follows the policy selected in Offload Settings.
Folder structure validation
For all routing presets except Copy everything as-is, SoundPrepper validates the source structure before starting. This validation is intentionally strict. If the selected source does not match the expected folder layout used by Sound Devices recorders, the run will not start. This helps prevent files from being routed into an incorrect destination structure.
Daily Name
The Daily Name is the destination folder name used for the run. In some workflows this matches the recorder’s original Daily folder name, but it can also be renamed for the destination.
Source and destination selection
The source is the folder you want to offload or compare from. This can be a recorder Daily folder or a supported Sound Devices card root.
Destination 1 is required. Destination 2 is optional. If Destination 2 is set, SoundPrepper can copy, verify, or compare a second destination in the same run.
Verification and reporting
During a run, SoundPrepper tracks progress overall and per file. Each file is given a status such as Pending, Copied, Verified, Skipped, Skipped (Verified), Not Verified, or Error.
At the end of a Copy + Verify or Verify Only run, SoundPrepper writes an offload manifest containing the planned file list and hashes, plus an offload report summarizing the result, warnings, errors, and per-file outcomes.
At the end of a Compare Source run, SoundPrepper writes compare-named report files. These provide an audit trail for the comparison but are kept separate from normal OffloadManifest_* files so they are not used by Verify Only scans.
Reports are stored in the configured reports folder inside the destination. If enabled in Offload Settings, reports can be saved to both destinations and revealed automatically when the run finishes.
Existing file handling
If a file already exists at the destination during Copy + Verify, SoundPrepper follows the policy selected in Offload Settings.
Basic workflow
1. Choose a source folder.
2. Choose Destination 1.
3. Optionally choose Destination 2 for a second destination.
4. Select an offload mode.
5. Select a routing preset.
6. Confirm or edit the Daily Name.
7. Click Scan to build the file list.
8. Click Start to begin the run.
The file list shows every planned file along with its size, status for each destination, and any warning or error message.
Offload modes
Copy + Verify
Copies files to the selected destination folders and verifies them using SHA-256 checksum comparison. SoundPrepper computes the source hash during copy, verifies the copied destination file against that hash, and writes the hash into the offload manifest for future verification.
Verify Only
Does not copy anything. SoundPrepper reads an existing OffloadManifest_*.json from Destination 1 and verifies the files already stored on disk against the hashes in that manifest.
When Scan is clicked in Verify Only mode, SoundPrepper searches the configured reports folder in Destination 1 for usable OffloadManifest_*.json files. If multiple usable manifests are found, SoundPrepper shows a picker so you can choose which manifest to verify against. The selected manifest path is shown in the source summary row together with file count and total size.
Verify Only requires manifests that contain SHA-256 hashes. Older or invalid manifests without hashes are ignored because they cannot be used for checksum verification.
Compare Source
Does not copy anything and does not require a manifest. SoundPrepper scans the selected source, resolves the expected destination paths using the current routing preset and Daily Name, then compares the source files directly against Destination 1 and, if set, Destination 2.
Compare Source is read-only for audio files. It reports missing files, hash mismatches, and verified matches, but it does not copy, replace, rename, or create destination audio files. Compare reports are written as OffloadCompareManifest_* and OffloadCompareReport_* files so they do not appear as Verify Only manifests.
Routing presets
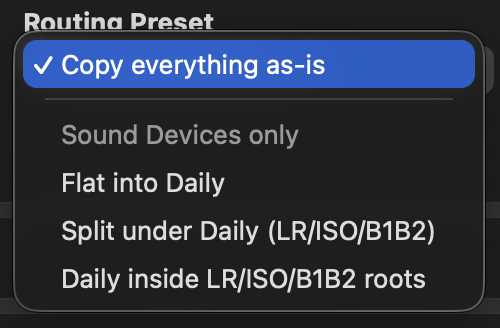
Copy everything as-is
Preserves the source folder structure under the destination Daily folder.
Flat into Daily
Places production-sound files directly inside the destination Daily folder. Subfolders are flattened according to the routing rules.
Split under Daily
Routes files into subfolders such as Daily/LR, Daily/ISO, and Daily/B1B2 based on filename suffixes. These presets are designed for production-sound workflows commonly associated with Sound Devices recorders and expect files to be classifiable as LR, ISO, or B1B2.
Daily inside roots
Routes files into root folders first, such as LR/Daily, ISO/Daily, and B1B2/Daily. These presets follow the same workflow assumptions and require files to be classifiable as LR, ISO, or B1B2.
Folder structure validation
For all routing presets except Copy everything as-is, SoundPrepper validates the source structure before starting. This validation is intentionally strict. If the selected source does not match the expected folder layout used by Sound Devices recorders, the run will not start. This helps prevent files from being routed into an incorrect destination structure.
Daily Name
The Daily Name is the destination folder name used for the run. In some workflows this matches the recorder’s original Daily folder name, but it can also be renamed for the destination.
Source and destination selection
The source is the folder you want to offload or compare from. This can be a recorder Daily folder or a supported Sound Devices card root.
Destination 1 is required. Destination 2 is optional. If Destination 2 is set, SoundPrepper can copy, verify, or compare a second destination in the same run.
Verification and reporting
During a run, SoundPrepper tracks progress overall and per file. Each file is given a status such as Pending, Copied, Verified, Skipped, Skipped (Verified), Not Verified, or Error.
At the end of a Copy + Verify or Verify Only run, SoundPrepper writes an offload manifest containing the planned file list and hashes, plus an offload report summarizing the result, warnings, errors, and per-file outcomes.
At the end of a Compare Source run, SoundPrepper writes compare-named report files. These provide an audit trail for the comparison but are kept separate from normal OffloadManifest_* files so they are not used by Verify Only scans.
Reports are stored in the configured reports folder inside the destination. If enabled in Offload Settings, reports can be saved to both destinations and revealed automatically when the run finishes.
Existing file handling
If a file already exists at the destination during Copy + Verify, SoundPrepper follows the policy selected in Offload Settings.
Skip if verified identical
Computes hashes for the source and existing destination file. If they match, the copy is skipped and marked as verified. If they differ, SoundPrepper proceeds according to the copy flow and reports the outcome.
Fail if exists
Fails whenever a file already exists at the destination, even if the files are identical.
Rename new copy
Keeps the existing file and saves the incoming file with a new unique name, then verifies that new copy.
Replace if different
Computes hashes for the source and existing destination file. If they match, the copy is skipped. If they differ, SoundPrepper writes and verifies a temporary copy, then replaces the existing file.
Offload Settings
Offload Settings define the default behavior for future runs, including the default routing preset, LR / ISO / B1B2 folder names, existing file policy, temporary file failure policy, reports folder name, whether reports are saved to both destinations, whether reports are revealed on completion, whether recorder/settings sidecar files are skipped, and whether empty destination folders are skipped.
Notes
• Copy + Verify creates or updates destination files and verifies them against the source.
• Verify Only uses an existing hash manifest and does not require the source.
• Compare Source requires the source and compares it directly to the destination without copying files.
• Destination 2 is optional, but if used it participates in copy, verify, or compare runs.
• The Scan button refreshes the planned file list before starting.
• Offload is designed to produce both verified copies and a record of what happened during the run.The Main Window
SoundPrepper's main window is organized around a few core areas:
1. Offloader
2. Production Sound Table (the "take list")
3. Metadata Editor
4. File to trim (the "take list" for files you want to trim)
5. Timeline
6. Playback
7. Create Report
8. Split/Combine
9. Tools (including iXML; BEXT and RIFF inspectors, Field Recorder Settings Editor and Renaming)
10. Settings
Window layout behavior
• Selection in the table drives what the editor shows.
• Batch operations apply to the current selection (or current take group), depending on the function.
The Production Sound Table
The table gives you a spreadsheet-like overview of imported files/takes.
Importing files
Common import paths:
• Drag-and-drop files or folders onto SoundPrepper.
• Use File → Import…
• Use Import… button
• Use keyboard shortcut CMD + I
 On import, SoundPrepper evaluates:
• Audio format basics (WAV/BWF variants)
• Available metadata chunks
• Timecode/sample rate/frame rate stamps
• Sibling relationships (poly+ISO, merged ISO groups, etc.)
• Mismatch flags (table highlighting and tooltips when enabled)
Selecting and multi-selecting
• Single selection: Editor shows that item.
• Multi-selection: When multiple files are selected, fields with differing values will display “Multiple values”, but can still be edited. Any change made will be applied to all selected files.
Sorting and customizing columns
• Columns can be shown/hidden and reordered.
• Sorting helps find inconsistencies quickly (scene/take duplicates, mismatched sample rates, etc.).
Row highlighting (mismatch / warnings)
SoundPrepper can visually flag rows (for example, red highlighting) when:
• Sibling metadata disagrees
• Filename-derived fields disagree with embedded metadata
• Filename-derived fields disagree with embedded metadata
• Fields changed from original values
Sibling metadata disagrees
For merged ISO sibling files, SoundPrepper compares a small set of metadata columns across all files in the sibling group. If one of these values differs between siblings, that column is shown in red in the Production Sound table.
This warning only highlights metadata differences between sibling files. It does not mean the file is damaged. It is intended to help you spot metadata that is inconsistent within the same ISO group.
The following columns can be highlighted in red:
• Scene
• Take
• Project
• Tape
• Notes
• Ubits
• UserInfo
This highlight can be disabled in the settings window.
Metadata Editor warnings and changed values
SoundPrepper also uses visual indicators in the Metadata Editor and More Info views. These are separate from the row highlighting used in the Production Sound table.
Some Metadata Editor values can turn red when SoundPrepper detects that related technical metadata does not agree. This does not necessarily mean the audio is damaged. It means that metadata values inside the file do not match and should be reviewed.
The following values can be shown in red:
On import, SoundPrepper evaluates:
• Audio format basics (WAV/BWF variants)
• Available metadata chunks
• Timecode/sample rate/frame rate stamps
• Sibling relationships (poly+ISO, merged ISO groups, etc.)
• Mismatch flags (table highlighting and tooltips when enabled)
Selecting and multi-selecting
• Single selection: Editor shows that item.
• Multi-selection: When multiple files are selected, fields with differing values will display “Multiple values”, but can still be edited. Any change made will be applied to all selected files.
Sorting and customizing columns
• Columns can be shown/hidden and reordered.
• Sorting helps find inconsistencies quickly (scene/take duplicates, mismatched sample rates, etc.).
Row highlighting (mismatch / warnings)
SoundPrepper can visually flag rows (for example, red highlighting) when:
• Sibling metadata disagrees
• Filename-derived fields disagree with embedded metadata
• Filename-derived fields disagree with embedded metadata
• Fields changed from original values
Sibling metadata disagrees
For merged ISO sibling files, SoundPrepper compares a small set of metadata columns across all files in the sibling group. If one of these values differs between siblings, that column is shown in red in the Production Sound table.
This warning only highlights metadata differences between sibling files. It does not mean the file is damaged. It is intended to help you spot metadata that is inconsistent within the same ISO group.
The following columns can be highlighted in red:
• Scene
• Take
• Project
• Tape
• Notes
• Ubits
• UserInfo
This highlight can be disabled in the settings window.
Metadata Editor warnings and changed values
SoundPrepper also uses visual indicators in the Metadata Editor and More Info views. These are separate from the row highlighting used in the Production Sound table.
Some Metadata Editor values can turn red when SoundPrepper detects that related technical metadata does not agree. This does not necessarily mean the audio is damaged. It means that metadata values inside the file do not match and should be reviewed.
The following values can be shown in red:
Channels
When the channel count in metadata does not match the file header. For merged ISO rows, this can also indicate that the number of merged source files does not match the channel metadata count.
Sample Rate
When sample rate values stored in different parts of the file do not agree, such as the file header, <DIGITIZER_SAMPLE_RATE>, and <FILE_SAMPLE_RATE>.
Samples Since Midnight
When the BEXT TimeReference value does not match the iXML TIMESTAMP_SAMPLES_SINCE_MIDNIGHT value.
Bit Depth
When the bit depth stored in the file header does not match the iXML <AUDIO_BIT_DEPTH> value.
These warnings are shown for single-file inspection in the Metadata Editor. In multi-selection views, SoundPrepper usually shows a mixed-value state instead of a red mismatch warning.
Filename-derived fields disagree with embedded metadata
SoundPrepper checks whether the file name matches the Scene, Slate, and Take stored in the file’s embedded metadata. If they do not agree, the entire row can be highlighted in red in the Production Sound table.
This check is based on the file name itself, not on sibling files. It is intended to help you spot files whose name suggests a different Scene/Slate/Take than the metadata written inside the WAV file.
A row is only flagged when SoundPrepper has enough metadata to compare:
• Scene
• Take
If the expected Scene[/Slate]+Take pattern cannot be found in the file name, the row is marked as a mismatch.
This highlighting can be disabled in the Settings window.
Fields changed from original values
SoundPrepper tracks whether metadata has been edited since the file was loaded or last reset. This is different from a mismatch warning.
A changed value means the current metadata no longer matches the original baseline stored by SoundPrepper for that file.
Changed-from-original values are shown at the file level rather than as per-field red labels.
• In the Production Sound and Trimmable tables, files with unsaved changes have the entire row highlighted in orange.
• In the editor area, Save and Reset become available when the current file or selection contains unsaved changes.
Tooltips
Where available, SoundPrepper uses tooltips to provide more detail about row highlights, warnings, mismatches, mixed values, and unsaved changes. A tooltip explains why a row or field has been highlighted and what kind of inconsistency or edit has been detected. These indicators are intended to help review metadata and do not necessarily mean that the file is damaged.The Metadata Editor
The Metadata Editor is where you view and edit the metadata that SoundPrepper exposes from each file. It focuses on production metadata, technical metadata, and related file-set information, while preserving existing chunks and ancillary data whenever possible.
SoundPrepper's general rule is to preserve existing metadata structure where possible and only rewrite what is needed for the user's change.
What you can view and edit
In the main Metadata Editor, the editable fields include:
File metadata:
• Scene
• Take
• Project
• Tape
• Notes
• Circled
• Wild Track
• User Bits
• User Info
Technical metadata:
• Frame Rate
• Preserve Start TC
• Start TC
• TC Sample Rate
This is shown as an editable control when Advanced Metadata Editing is enabled in Settings.
The main Metadata Editor also shows read-only technical values such as:
• File Name
• File UID
• Channels
• Sample Rate
• Bit Depth
• Duration
• Samples Since Midnight
Additional related fields are available in the More Info view, including:
• Current Name
• Original Name
• Parent Name
• Parent UID
• Family Name
• Family UID
• Total Files
• File Set Index
Batch editing
When multiple files are selected, SoundPrepper supports batch editing for many fields. If selected files do not share the same value, the field shows a mixed state such as Multiple values.
For editable text fields, entering a new value applies that value to the selected files.
For checkboxes such as Circled and Wild Track, a mixed selection is shown with a mixed checkbox state until you choose a new value.
Some fields remain constrained in batch editing:
• channel-dependent metadata must remain compatible with the selected files
• some technical and timecode-related edits are limited to avoid accidental sync problems
• mismatch warnings are suppressed in mixed state and replaced by mixed-value display
Saving changes
Edits are made in memory first and are not written to disk until you click Save.
• Save writes the modified metadata for the currently selected modified files.
• Reset discards unsaved changes for the currently selected modified files and restores their original loaded values.
SoundPrepper does not rely on an automatic save-or-discard prompt when switching selection in this workflow. Instead, unsaved files remain marked as modified until you explicitly save or reset them.
Find & Replace
Use Find & Replace to make the same metadata edit across multiple selected files at once. Open it from Edit > Find & Replace… or press Option-Command-F. The command works on the files currently selected in the Production Sound list; if nothing is selected, SoundPrepper shows a warning and does not apply any changes.
Choose the metadata field you want to edit, then enter the text to find and the replacement text. The available fields are Scene, Take, Project, Tape, Notes, User Info, and Channel info. For Channel info, SoundPrepper searches both the channel name and the channel function for each selected file.
Three search options are available:
• Case sensitive matches letter case exactly.
• Whole words only matches complete words.
• Use regex treats the Find text as a regular expression.
When Use regex is enabled, Whole words is turned off because the regular expression defines the match boundaries instead. In regular-expression mode, replacement text follows regex replacement rules. In normal text mode, replacement text is treated literally.
Click Replace to apply the change immediately to all selected files. SoundPrepper reports how many matches were replaced and how many files were changed.
The window also includes Normalize, which converts the selected field to sentence case across the current selection. This is useful for quickly cleaning up entries such as notes, project names, or channel labels.
Files to Trim
The Files to Trim tab is a staging area for WAV files you want to process with SoundPrepper's trimming workflow. Import files here when they are source recordings that should be matched against Production Sound by timecode and overlap, then trimmed into new output files. You can add files with File > Import to Files to Trim…, the Import… button in the tab, or by dragging WAV files or folders directly into the table.
The table supports multi-selection, sorting, column reordering, column resizing, and a header menu for showing or hiding columns. The default columns include file name, scene, take, tape, timecode, duration, frame rate, sample rate, bit depth, channel names, and channel functions. Imported folders are scanned recursively for WAV files.
Right-click selected rows to open the context menu:
• Reveal in Finder shows the source files in Finder.
• Remove Selected from List removes the selected entries from the Files to Trim list only.
• Remove All from List clears the current list.
• Copy Selected to Production Table adds the selected files to the Production Sound table.
You can also press Delete or Forward Delete to remove selected rows from the Files to Trim list. Removing a file from this table does not delete it from disk.
While a trim run is in progress, the tab shows a progress bar and a Cancel button. The progress indicator reports completion percentage and updates to a cancelling state if you stop the run.
Renaming Files
SoundPrepper builds renamed file names from the fields and options in the Rename settings.
The rename pattern is based on:
• Prefix
• Scene
• Take
• Take prefix
• Suffix
• Part separator
• Zero-pad scene
• Zero-pad take
In practice, SoundPrepper rebuilds the name around the Scene and Take values, with optional prefix and suffix text, and uses the configured separator and padding rules from the Settings window.
Depending on the Rename settings, SoundPrepper can also preserve parts of the original file name:
• Preserve existing prefix
• Preserve existing suffix
• Preserve trailing tokens
Trailing tokens include items such as _ISO, _LR, _L, _R, _MIX, _CH3, _A1, and numeric endings such as _1.
For split takes, SoundPrepper also preserves a trailing take letter when present in the original file name, for example T02A.
When renaming merged ISO groups, SoundPrepper applies the same naming logic to each constituent file and preserves distinguishing trailing tokens or numeric endings where needed so files do not collapse onto the same name.
If a target name already exists, SoundPrepper resolves the conflict using its rename conflict handling, for example by adding a numeric suffix, skipping, or overwriting, depending on the active rename path.
To protect metadata integrity, SoundPrepper does not allow rename to proceed when unrelated metadata changes are still unsaved.
• Rename is allowed when only Scene and Take changes are pending. Renaming will also save these unsaved values
• Rename is blocked when other metadata is still unsaved, and the user is asked to Save or Reset those changes first.
See the Rename Settings section for details about available rename options and how renamed file names are constructed.
Rename Backups
When SoundPrepper renames audio files, it creates backup copies before moving the original files on disk. Rename backups are separate from Undo. Undo covers supported metadata and list actions, while rename protection is handled by saved backup files.
For each rename operation, SoundPrepper creates a timestamped backup set inside every source folder involved in the selection:
<source folder>/.soundPrepper/Backups/<yyyy-MM-dd_HH-mm-ss>/
Each file that is actually renamed is copied into that backup set before SoundPrepper moves it to the new filename. If an ISO group is renamed, every constituent file in the group is backed up before its own rename is attempted.
If a backup cannot be created or verified, SoundPrepper cancels the rename operation before continuing with the remaining files. This prevents SoundPrepper from renaming files without first preserving the originals.
If a rename would overwrite an existing destination file and the overwrite is confirmed, SoundPrepper also protects the existing destination by moving it into a separate conflict-backup folder:
<target folder>/.SoundPrepperBackups/<yyyy-MM-dd_HH-mm-ss>/
These conflict backups are only used for overwrite protection. Normal rename backups are stored in .soundPrepper/Backups.
The Backups tab in Settings can show the number and size of rename backup sets for a chosen audio folder, reveal the backup folder in Finder, delete backup sets older than 14 days while keeping the newest set, or delete all backup sets except the most recent one.
Playback
The Audio Preview window lets you quickly audition the currently selected audio file.
The window displays:
• a time counter
• a timeline ruler
• waveform tracks for each channel
• track headers with channel names
• transport controls for playback
When available, channel names are taken from embedded metadata. If no channel names are present, SoundPrepper uses default channel labels.
The Audio Preview window supports both polyphonic WAV files and split-mono file sets. For split-mono material, SoundPrepper combines the selected files into a single preview session so they can be reviewed together.
If the Audio Preview window is active, pressing the Space bar toggles playback. To avoid interfering with text entry, this shortcut is ignored while typing in a text field.
If enabled, SoundPrepper can also automatically start preview playback when the selection changes.
Playback stops automatically when the Audio Preview window is closed.
Playback controls
The Audio Preview window includes several control options below the waveform display.
Return on Stop
When enabled, Stop returns the playhead to the start. When disabled, playback resumes from the last stop position.
Autoplay on selection
When enabled, selecting a new file starts playback automatically while the Playback Preview window is open.
Stay on top
When enabled, the Playback Preview window stays above other windows.
Waveform zoom follows gain
When enabled, waveform height follows each channel's gain fader. Raising or lowering a channel's gain also changes the visual waveform scale for that channel.
Solo focus
When enabled, only soloed channels are shown. This makes it easier to focus on the channels currently being auditioned.
Solo and Mute buttons
Each channel row includes Solo and Mute buttons.
• Clicking Solo by itself solos that channel and clears any other solo selections.
• Clicking Mute by itself mutes that channel and clears any other mute selections.
• Shift-click Solo allows multiple channels to be soloed at the same time.
• Shift-click Mute allows multiple channels to be muted at the same time.
Pan and gain controls
Each channel row includes a Pan slider and a Gain slider.
• Pan adjusts the channel position between left and right.
• Gain adjusts the playback level for that channel.
Double-click behavior:
• Double-click the Pan slider to reset it to center.
• Double-click the Gain slider to reset it to its unity gain.
• Double-click the master gain control in the transport area to reset it to unity gain.
Where available, tooltips in the Playback Preview window provide a short explanation of these controls.Timecode, Sample Rate, Frame Rate, and “Preserve Start TC”
Start TC, Frame Rate, and Samples Since Midnight
This is one of the most important areas in SoundPrepper, because it affects how timecode is displayed, interpreted, and written back to the file.
Key terms
Start TC: the human-readable start timecode shown in the app, such as HH:MM:SS:FF
Samples Since Midnight (SSM) / Time Reference: the underlying sample-based timestamp stored in BEXT and iXML
Frame Rate: the timecode counting rate, such as 23.976, 24, 25, 29.97, 29.97 DF, 30, or 30 DF
TC Sample Rate: the timestamp sample rate used for iXML time-reference calculations. This is mainly an advanced or repair-level field.
Preserve Start TC: controls whether SoundPrepper keeps the displayed Start TC fixed when timecode-related metadata is changed
Preserve Start TC = ON
This is the default behavior and is generally the safer choice.
When enabled, SoundPrepper preserves the visible Start TC and recalculates the underlying samples-since-midnight values as needed when you change:
• Frame Rate
• Start TC
• TC Sample Rate
This is the mode to use when the displayed start timecode is the value you want to keep stable.
Preserve Start TC = OFF
When disabled, SoundPrepper no longer freezes the displayed Start TC. In that case, changes to the underlying timestamp interpretation can cause the displayed Start TC to change.
This is mainly useful for advanced repair or reinterpretation workflows.
Important consistency rule
SoundPrepper checks both BEXT and iXML time-reference values.
If BEXT TimeReference and iXML TIMESTAMP_SAMPLES_SINCE_MIDNIGHT do not match, the Metadata Editor shows a warning.
When SoundPrepper rewrites timecode-related metadata, it aims to keep those values consistent after save.
Changing frame rate
Changing Frame Rate updates the timecode rate metadata used to interpret Start TC.
With Preserve Start TC enabled, SoundPrepper recalculates the underlying timestamp values so the displayed Start TC remains the same.
With Preserve Start TC disabled, the displayed Start TC may change to reflect the existing underlying timestamp values under the new frame-rate interpretation.
This is commonly used when:
• the recorder was set to the wrong frame rate
• post-production needs a different timecode interpretation for sync or conform
Changing TC Sample Rate
Changing TC Sample Rate changes the sample-rate basis used for iXML timestamp calculations.
With Preserve Start TC enabled, SoundPrepper updates the iXML timestamp values from the BEXT reference so the displayed Start TC remains stable.
This control is intended mainly for advanced metadata repair workflows and is only directly editable when Advanced Metadata Editing is enabled in Settings.
Editing Start TC directly
The Edit TC button lets you enter a new Start TC value directly.
With Preserve Start TC enabled, SoundPrepper recalculates the underlying time-reference values from the entered label.
This is the most direct way to correct an incorrect start timecode.
Important note about sample rate
The Sample Rate shown in the Metadata Editor is currently a displayed technical value with mismatch warnings. It is not the same thing as the editable TC Sample Rate, and it is not directly edited from this control in the current Metadata Editor workflow.
Split / Combine
SoundPrepper includes a dedicated Split / Combine window for breaking out tracks from existing files and creating new poly files from mono material.
The available processing modes are:
• Break out Mix
• Break out ISO
• Split to Mono
• Combine to Poly
You can enable one or more of these options in the same processing run.
Break out Mix
Use Break out Mix to create mix-track outputs from material that contains LR or mix channels.
The mix output can be placed:
• First
• Last
This is useful when a mix track needs to be separated for editorial or delivery.
Break out ISO
Use Break out ISO to extract ISO tracks into separate outputs.
This is intended for workflows where ISO material needs to be delivered separately from mix tracks.
Split to Mono
Use Split to Mono when you want one output file per channel.
SoundPrepper supports two mono suffix styles:
• _1, _2, _3…
• .A1, .A2, .A3…
This allows mono outputs to match different naming conventions.
Combine to Poly
Use Combine to Poly to create a new polyphonic WAV file from mono source files.
This is useful when you need to:
• recombine mono siblings into a poly file
• rebuild a poly file from split tracks
• control output track order
Routing Matrix
For more advanced routing, SoundPrepper includes a separate Routing Matrix window.
The Routing Matrix lets you:
• map input channels to output files
• control which channels are written to each output row
• use automatic or manual output suffixes
• set the output destination folder
This provides a more explicit routing workflow than the standard Split / Combine options.
Output naming
SoundPrepper uses predictable output naming based on the selected processing mode.
For mono outputs, the selected mono suffix style is used.
In the Routing Matrix, each output row can use either:
• an automatically derived suffix
• a manually entered suffix
Output location
Each processing mode has its own destination folder control.
You can also enable Open destination folder after processing to reveal the result when processing is complete.
Reports
SoundPrepper can generate CSV and PDF sound reports from the selected production files.
The report layout is configurable in the Create Report window. You can choose:
• the report format: CSV or PDF
• which files to include: All Files, Non-Circled Takes, Circled Takes, or Wild
• which columns to include in the report
• optional header and recording-information fields
Typical report contents
Depending on the selected columns and report settings, reports can include:
header information such as:
• Project
• Job
• Client
• Production Company
• Producer
• Director
• Date
• Location
• Folder
• Sound Mixer
• Boom Operator
• Comments
recording information such as:
• Roll
• Tape
• Recorder
• Media
• File Type
• Sample Rate
• Frame Rate
• Bit Depth
• Tone Level
• Mic
per-file report columns such as:
• File Name
• Scene
• Take
• Tape
• Channels
• Sample Rate
• Frame Rate
• Bit Depth
• Start TC
• Duration
• Wild
• Circled
• Notes
• Channel Names
CSV and PDF behavior
CSV and PDF exports use the same underlying file selection and column-selection model.
CSV exports a tabular sound report.
PDF exports a formatted printable report with a live preview in the Create Report window.
SoundPrepper also provides preview modes before export:
• a table preview for CSV
• a PDF preview for PDF output
Why reports matter
Reports are useful for:
• communicating production sound information to editorial
• documenting file metadata and take details
• delivering a consistent summary of the recorded material
The current Create Report workflow is focused on structured sound-report export. It is not primarily a separate "issues and warnings report" system.Settings
The Settings window controls rename behavior, metadata-writing preferences, backup management, and default table visibility.
The main Settings tabs are:
• Rename
• Metadata
• Backups
• Table
• Experimental
This tab is only shown when experimental flags are enabled.
Rename
The Rename settings are available in the Rename tab:
• Prefix
• Suffix
• Part separator
• Take prefix
• Zero-pad scene
• Zero-pad take
• Preserve existing prefix
• Preserve existing suffix
• Preserve trailing tokens
• Verify checksum
These settings control how renamed file names are constructed and how strictly rewritten files are verified after save.
Metadata
The Metadata tab contains metadata-writing and timecode-display preferences, including:
• Drop-frame display mode
• BEXT Description style
• BEXT loudness placement
• Large-file container format
• Remove channel FUNCTION on trim
• Write minimal iXML when missing
• Enable Advanced Metadata Editing
• Disable mismatch highlighting columns
• Disable filename mismatch highlighting rows
These settings affect how SoundPrepper displays and writes metadata, and how metadata warnings are shown in the UI.
Backups
The Backups tab lets you manage the hidden .SoundPrepperBackups folder used for backup sets.
Available controls include:
• viewing backup count and total size
• revealing the backups folder
• changing the backup location
• deleting backup sets older than 14 days
• deleting all backup sets except the most recent
Table
The Table tab controls which columns are visible by default in:
• the Production Sound table
• the Trimmable Sound Files table
This tab sets default column visibility. It does not control split/combine destinations or export destination behavior.
Advanced / Experimental
SoundPrepper also supports an Experimental tab for internal or advanced feature flags when that tab is enabled.
At present, this includes experimental flags such as:
• File Bytes Chunk Cache
This area is intended for advanced testing and development-oriented options rather than standard workflow setup.
So the main correction is:
• default destination folder behavior and auto-open destination folder after processing are not general Settings-window options here
• those behaviors are handled in the relevant processing windows, such as Split / Combine or Offload, not in the main Settings tabs
File Integrity and Error Handling
SoundPrepper is designed around safe file handling:
• Coordinated writes to avoid partial updates
• Atomic write patterns where appropriate
• Clear errors when:
– WAV headers are invalid/truncated
– Chunk sizes don't match file size
– Permissions/bookmarks are missing or stale**
Common import warning: truncated WAV / invalid RIFF
If a file claims a RIFF size larger than the actual file length, it may be truncated and unsafe to process until repaired or re-copied.
Keyboard Shortcuts
Global Menu Shortcuts
⌘ + HHide SoundPrepper
⌘ + ⌥ + HHide Others
⌘ + ,Settings
⌘ + QQuit
⌘ + IImport
⌘ + ⇧ + IImport to Files to Trim
⌘ + WClose window
⌘ + ZUndo
⌘ + ⇧ + ZRedo
⌘ + ASelect All
⌘ + CCopy
⌘ + VPaste
⌘ + XCut
⌘ + ⌥ + FFind & Replace
⌘ + RReload
⌘ + ⌥ + PArtwork Preview
⌃ + ⌘ + FEnter / Exit Full Screen
⌘ + MMinimize
⌘ + ?Open manual
⌘ + ⇧ + /Help menu search (on layouts where ⌘ + ⇧ + / differs from ⌘ + ?)
Hold ⌥ while opening SettingsOpens Advanced Settings
Production Sound Table
Delete / Backspace / Forward DeleteRemove selected rows
SpaceToggle preview playback for current selection
Mouse click on the tableMakes the table first responder
Files to Trim Table
Delete / Backspace / Forward DeleteRemove selected rows
Mouse click on the tableMakes the table first responder
Field Recorder / SDJson Editor
DeleteClears the Name value for selected rows
Timeline Keyboard Shortcuts
These work when the timeline has focus and you are not editing a text field.
SpacePlay / pause timeline
TZoom in
RZoom out
FFit full day
, (comma)Move selected clips (or playhead if no clips are selected) back 1 frame
. (period)Move selected clips (or playhead if no clips are selected) forward 1 frame
MMove selected clips (or playhead if no clips are selected) back 5 frames
Key right of PeriodMove selected clips (or playhead if no clips are selected) forward 5 frames
⌘ + ⇧ + DClear clip selection
Keypad −Nudge selected clip start TC by 1 frame earlier
Keypad +Nudge selected clip start TC by 1 frame later
⇧ + Keypad −Nudge selected clip start TC by 5 frames earlier
⇧ + Keypad +Nudge selected clip start TC by 5 frames later
LJump to previous clip edge
Ä or ' (US keyboard)Jump to next clip edge
QCenter playhead in view
Timeline Mouse Modifiers
⇧ + drag outside a clipBegin marquee selection
⇧ + ⌥ + drag outside a clipBegin additive marquee selection
⌃ + click on a clipMove clip start to current playhead position
⇧ + click on a clipAdd / remove clip from current selection
Click on a clipSelect only that clip
Double-click a clipSelect it and move playhead to clip start
⌘ + drag on a clipSample-resolution drag
⌘ + drag on the rulerFine-adjust playhead without frame snapping
⌥ + scrollZoom timeline horizontally
⇧ + ⌥ + scrollAdjust track height instead of scrolling / zooming
Audio Preview Keyboard
SpacePlay / pause preview
Audio Preview Mouse / Double-Click Behaviors
Double-click channel pan sliderReset pan
Double-click channel gain sliderReset gain to unity
Double-click master gain sliderReset master gain to unity
⇧ + click SoloAdditive solo toggle for that channel
Click SoloExclusive solo for that channel
⇧ + click MuteAdditive mute toggle for that channel
Click MuteExclusive mute for that channel
Undo
The following actions are undoable:
1. Saving metadata
• Undo restores the previous metadata chunks for the affected WAV files.
• Applies to normal metadata saves from the main metadata editor.
• Action name: Save Metadata
2. Resetting unsaved metadata edits
• Undo restores the metadata values that were present before Reset was clicked.
• Applies to one or more selected Production Sound files.
• Action name: Reset Metadata
3. Editing BEXT metadata
• Undo restores the previous BEXT chunk contents after a saved BEXT edit.
• Action name: Edit BEXT
4. Editing raw iXML
• Undo restores the previous iXML chunk contents after a saved raw iXML edit.
• Action name: Edit Raw iXML
5. Generating iXML
• Undo restores the previous metadata chunks for files where iXML was generated.
• Action name: Generate iXML
6. Generating UMIDs
• Undo restores the previous metadata chunks for files where UMIDs were generated.
• Action name: Generate UMID
7. Updating BEXT description from iXML
• Undo restores the previous metadata chunks after the description is updated from iXML.
• Action name: Update Description from iXML
8. Removing Soundminer chunks
• Undo restores removed Soundminer metadata chunks when the operation changed one or more files.
• Action name: Remove Soundminer chunk
9. Removing other RIFF chunks from the chunk viewer
• Undo restores removed chunks when the chunk removal operation changed the file.
• Action name: Remove chunk or a more specific chunk-removal label
10. Production Sound list removals
• Undo restores removed files to the Production Sound list and restores selection where possible.
• Includes:
• Remove one production file
• Remove multiple production files
• Remove all production files
• Action names: Remove Production File, Remove Production Files, Remove All Production Files
11. Files to Trim list removals
• Undo restores removed files to the Files to Trim list and restores selection where possible.
• Includes:
• Remove one file to trim
• Remove multiple files to trim
• Remove all files to trim
• Action names: Remove File to Trim, Remove Files to Trim, Remove All Files to Trim
12. Timeline start timecode edits
• Undo restores the previous start timecode for the affected clips/files.
• Includes:
• Nudging clips earlier or later
• Moving clips on the timeline
• Moving a clip to the playhead
• Direct start timecode changes
• Action names include: Nudge Clips, Move Clips, Move Clip To Playhead
13. Timeline start timecode reset
• Undo restores the start timecode values that were present before Reset.
• Action names: Reset Start TC, Reset Start TCs
14. Saving timeline start timecode changes
• Undo restores the previous on-disk metadata chunks after timeline start timecode changes are saved.
• Action name: Save Metadata
15. Field Recorder JSON track-name row changes
• Undo restores the previous row list and selection.
• Includes:
• Add row
• Delete row
• Move row up
• Move row down
• Sort selected rows
• Drag-reorder rows
• Action names: Add Row, Delete Row, Move Row Up, Move Row Down, Sort Rows, Reorder Rows
Important Notes
Undo applies after an operation has registered an undo step. For metadata file writes, that usually means after the save or write operation completes successfully.
Typing into metadata fields is not generally a separate undo step by itself. The undoable operation is the save, reset, generated metadata write, chunk removal, list removal, or timeline edit that the app records.
Undo may ask what to do if a file appears to have been modified outside SoundPrepper since the undo step was created. In that case, the user can choose whether to restore anyway, skip, or cancel.
Glossary
BWF: Broadcast Wave Format. An extension of WAV that includes metadata for professional audio.
BEXT: Broadcast Extension chunk.
iXML: XML metadata chunk commonly used in production sound.
SSM / Time Reference: Samples since midnight time stamp used for time reference.
Frame rate: Timecode frames per second (including DF/NDF variants).
Polyphonic / Poly: Interleaved multichannel WAV.
ISO: Isolated microphone channel file(s).